Driverのインストール
Appium2.0本体がインストールされたので、次にAppium2.0で制御したい環境のDriverをインストールしていきます。Appium2.0では本体とDriverが分離され、必要なDriverだけインストールして管理していきます。
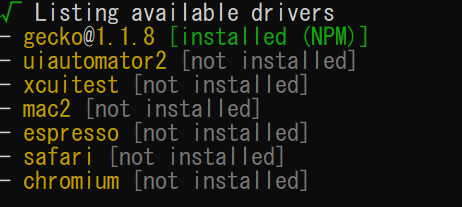
以下のコマンドを実施することでAppiumが把握しているofficialなDriverのリストとインストール状況を確認することが出来ます。
下図では予めインストールしたgeckoドライバーのみがインストールされていることがわかります。
Driverのインストールを実施します。インストールコマンドは以下のようになります。
appium driver install <driverName>
Android Emulatorと接続したいのでuiautomator2をインストールしていきます。ここでは「appium driver install uiautomator2」を実行します。インストールが完了すると以下のように表示されます。

また、以下のコマンドを実行することでインストールされているドライバーのみを表示させることが出来ます。
appium driver list --installed

前のページへ次のページへ
Fatal error: Uncaught Google_Service_Exception: Error calling GET https://www.googleapis.com/analytics/v3/data/ga?ids=ga%3A138132118&start-date=7daysAgo&end-date=yesterday&metrics=ga%3Apageviews&dimensions=ga%3ApageTitle%2C+ga%3ApagePath&sort=-ga%3Apageviews&max-results=1000: (403) User does not have sufficient permissions for this profile. in /home/users/1/monda-muki/web/seleniumqref.com/google-api-php-client-1-master/src/Google/Http/REST.php:110
Stack trace:
#0 /home/users/1/monda-muki/web/seleniumqref.com/google-api-php-client-1-master/src/Google/Http/REST.php(62): Google_Http_REST::decodeHttpResponse(Object(Google_Http_Request), Object(Google_Client))
#1 /home/users/1/monda-muki/web/seleniumqref.com/google-api-php-client-1-master/src/Google/Task/Runner.php(174): Google_Http_REST::doExecute(Object(Google_Client), Object(Google_Http_Request))
#2 /home/users/1/monda-muki/web/seleniumqref.com/google-api-php-client-1-master/src/Google/Http/REST.php(46): Google_Task_Runner->run()
#3 /home/users/1/monda-muki/web/seleniumqref in /home/users/1/monda-muki/web/seleniumqref.com/google-api-php-client-1-master/src/Google/Http/REST.php on line 110